Port forwarding: How to set up Virtual Server on TP-Link ISP-customized Router
Introduction
This article provides the step-by-step instructions for setting up the Virtual Server in TP-Link ISP-customized routers.
When you build a server on a local network and want to share it on the Internet, Virtual Server can provide services to Internet users. At the same time, virtual servers can keep the local network safe while other services remain invisible to the Internet.
Virtual servers can be used to set up public services on your local network, such as HTTP, FTP, DNS, POP3/SMTP, and Telnet. Different services use different service ports.
Port 80 is used for the HTTP service, port 21 for the FTP service, port 25 for the SMTP service, and port 110 for the POP3 service. Please verify the service port number before the configuration.
Requirements
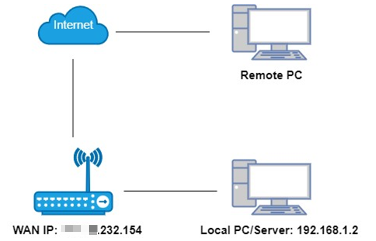
For example, I would like to directly access a server/personal website on my computer (192.168.1.2) through the public network. This computer is connected to the router with the WAN IP address XX.XX.232.154. Therefore, I can configure a virtual server on the router for this server/personal website.
- Ensure that your router has a public WAN IP. A private IP address (within the following ranges) means that another router will block the port connection.
10.0.0.0 to 10.255.255.255
172.16.0.0 to 172.31.255.255
192.168.0.0 to 192.168.255.255
100.64.0.0 to 100.127.255.255
- Reserve an IP address for your computer, for example, 192.168.1.2.
Configuration
Step 1. Log in to the router's web interface. Ensure your device is connected to the router via Wi-Fi or an Ethernet port. Open a web browser and enter one of these addresses in the browser bar to access the web interface:
For models starting with E/H: http://tplinkwifi.net
For models starting with V/N/M: http://tplinkmodem.net
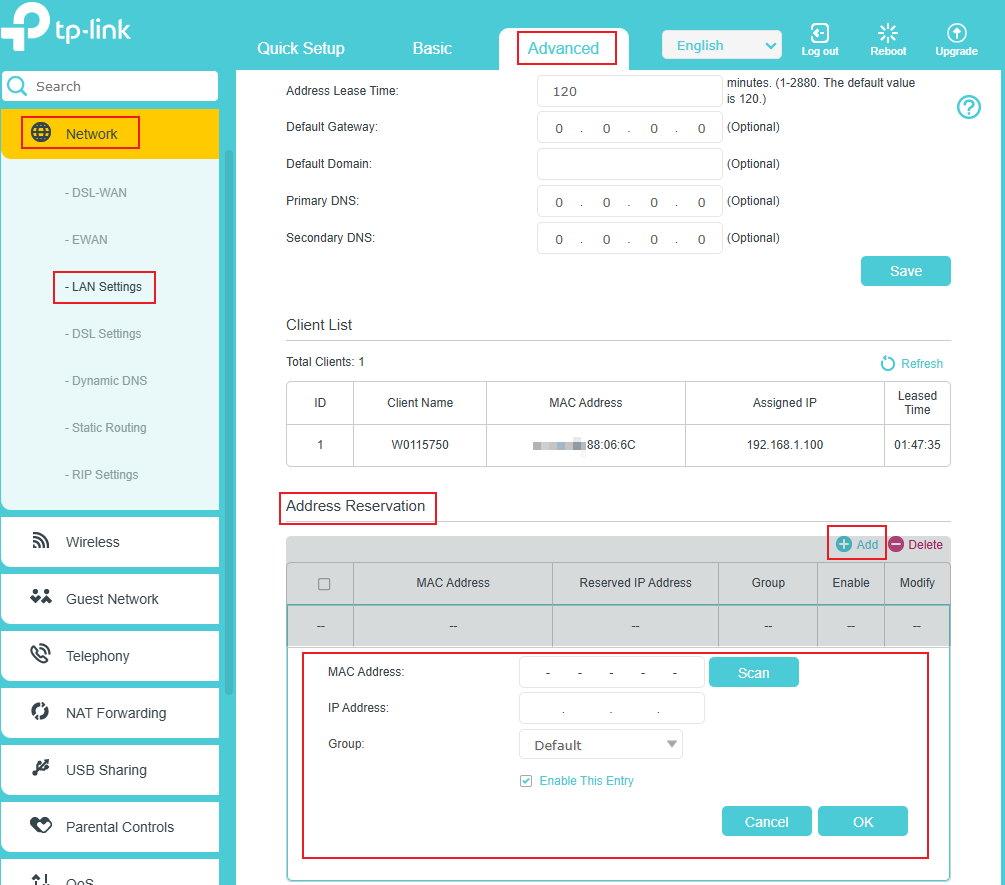
Step 2. Reserve an IP address (e.g., 192.168.1.2) for your computer:
Go to Advanced > Network > LAN Settings; scroll down the screen to the Address Reservation section, click Add > Scan, select your computer, then click OK.
Note: The IP address to be reserved must be on the same network segment as the router’s LAN IP. For example, the LAN IP is 192.168.0.1, and we can only reserve an IP starting with 192.168.0.xx.
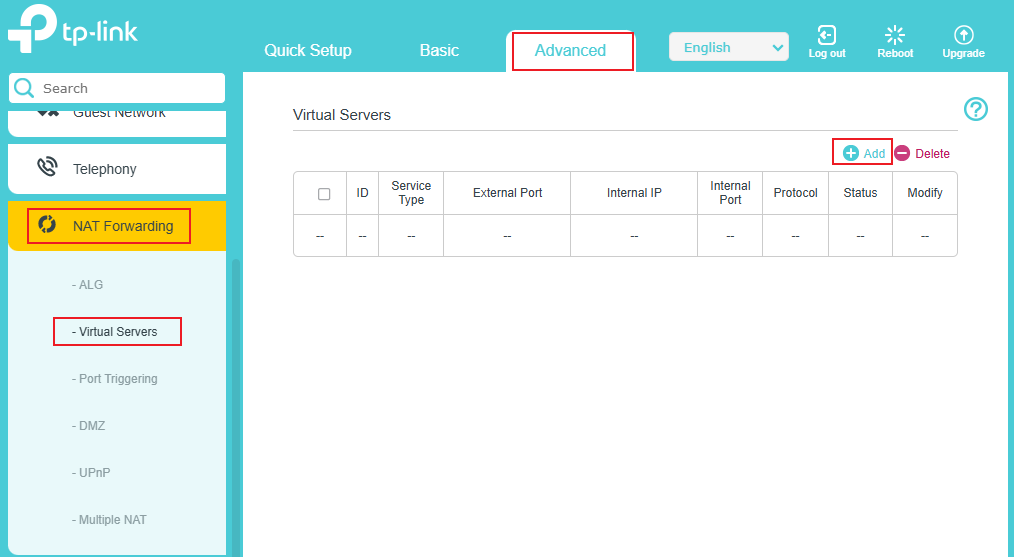
Step 3. Go to Advanced > NAT Forwarding > Virtual Servers, click Add.
Step 4.
- Select your Interface. If you are not sure, keep the default settings.
- Select your Service Type. If the service you want to use is not included in the service type list, you can manually enter the corresponding parameters.
- Enter the External Port, the Internal IP (the IP address of your local computer, and the Internal Port. You should verify the port number that the service needs.
- Select the Protocol. It is recommended to keep the default settings if you are unsure which protocol to use.
- Check the box Enable This Entry.
- Click OK to save the settings.
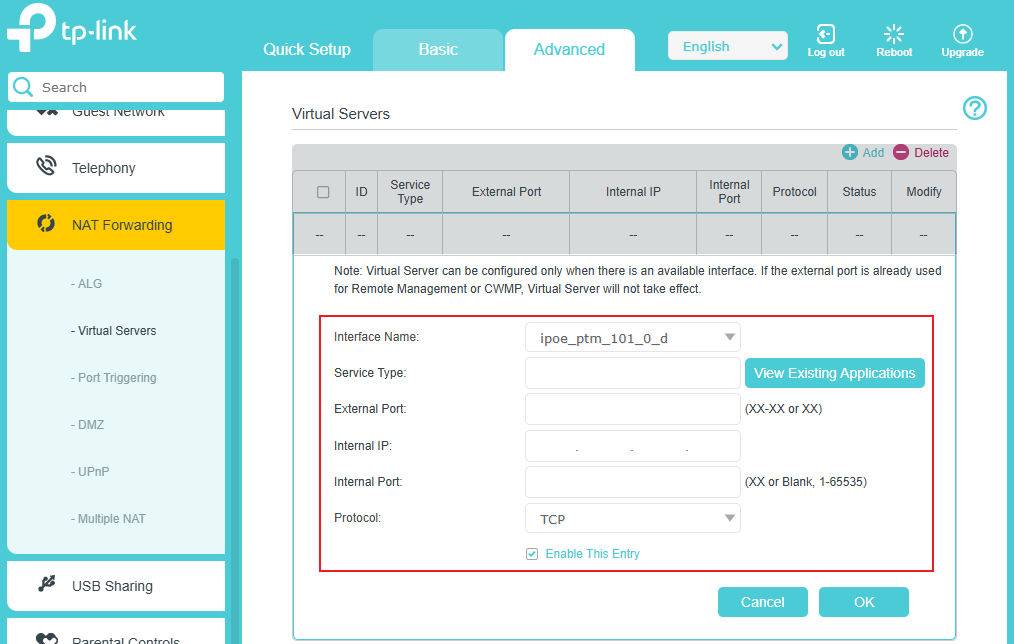
Note: You can add multiple virtual server rules to provide several services on a router. Please note that the External Port cannot be overlapped.
Step 5. Users on the Internet can enter http:// WAN IP: External Port (in this example: http:// xx.xx.232.154: 10000) to visit the server/personal website.
Note:
- If you want to access this port using a domain name, you need to set up a Dynamic DNS binding for the router.
How to access via domain name: http:// domain name: External Port (in this example: http://tplinkwifi.net: 10000)
- Make sure the server is accessible from the internal network. You can check if you can access that server in the local network. If you are unable to access the server on the internal network, check the server's settings.
- Make sure that the services on that specific Internal IP address were allowed to be viewed from outside. On a Windows computer, it basically allows Apps through the firewall settings or just disables the Windows firewall if you want to use it as a web server.
