How to manage user TP-Link IDs on TP-Link ISP-customized Router

02-09-2026
5311
NE211-Outdoor V1, NE210-Outdoor V1, NB425v V1, NE225-Outdoor V1, VB433v V1, NX620v V2, VB400v V1, VX800v V1, EB810v V1, VX420-G2h V3, HB810 V1, VX420-G2h V2, HB810 (EU) V1, HB710 (EU) V1, HB710 V1, HB615 V1, HB610 (EU) V2, HB610 V2, HB410 (EU) V1, Deco X53-DSL V1, HB210 Pro V1, HB210 Pro (EU) V1, HB210 V1, Deco BE28 V1, XGB830v V1, HX716 Pro V1, VX231v V1, HX710 Pro V1, VX230v V1, XGB430v Pro V1, XGB430v V1, EB610v V1, XB430v V1, VX220-G2v V1, XX532v V1, EB431v V1, XX530v V2, HX710 V1, XX530v V1, VC321-G2v V1, Archer VR1210v V2, Archer VR1210v V1, XX530 V2, HX510-PoE V1, VC221-G3v V1, HX510-Outdoor V1, HX510 V1, EB200v Pro V1, Archer VR1600v V1, HX510 V2, HX520 V1, HX521 V1, XX231v V1, HX220 V1, HX141 V1, VC220-F3v V1, EB210 Pro V1, HC220-G5 V1, VN020-F3 V1, XX230v V1, EB210 V1, TD-W8961N V1, XC220-G3v V2.30, XC220-G3 V1, XN020-G3v V1, NX520v V1, XN020-G3 V2, NX511v V1, XN020-G3 V3, NX510v V1, EX920 V1, NX220v V1, MX110v V1, MX515v V1, Deco X58-4G V1, EX820v V1, EX710 Pro V1, EX710 V1, EX510 Pro V1, EX510 V1, EX511 V2, EX520 V1, EX520v V1, EX521 V1, EX530v V1, Archer MR600 V2, Archer MR600 V1, EX220 V1, Archer MR400 V2, Archer MR400 V4, Archer MR400 V3, EX222 V1, Archer MR200 V3, Archer MR200 V5, XGZ030v V2, Archer MR200 V4, XGZ030 V2, EX230v V1, XGZ030 V1, TL-MR6500v V1, XGZ032v V1, XGZ032 V1, TL-MR6400 V5, TL-MR6400 V4, XZ005-G6 V1, TL-MR100 V1, EX141 V1, XZ000-G6v V1, XZ000-G6 V1, EC225-G5 V1, XZ001-G7 V1, XZ001-G6 V1, EC223-G5 V1, EC220-G5 V2, EC220-G5 V3, XZ000-G7 V1, XZ000-G7 (UPC) V1, EC220-F5 V1, TL-WR850N V1, DS-P8000-X7 V1, DS-P8000-X2 V1, DS-LGPA-16 V1, DS-LGPA-08 V1, DS-P7500-16 V1, DS-P7501-08 V1, DS-P7500-08 V1, DS-P7001-16 V1, DS-P7001-08 V1, DS-P7001-04 V1, DS-P7001-01 V1, DS-ETPA-1U V1, PSM150-DC V1, TL-SM7110-SR V1, DS-PMA-C++ V2, DS-PMA-Combo C+ V1, DS-PMA-C+ V2, DS-PMA-C+ V1, XGM80A V1, XM60A V1

Introduction

This article provides step-by-step instructions for managing TP-Link IDs on an ISP-customized router, including adding and removing user accounts.

The TP-Link ID used for the first login will be automatically bound to your router as an Admin account. An admin account can add or remove other TP-Link IDs to the same router as User accounts.

Admin account and User accounts both can monitor and manage the router locally or remotely, except that user accounts cannot:

  • Reset the router to its factory default settings from the web management page or the Aginet app.
  • Add/remove other TP-Link IDs to/from the router.

Configuration

Step 1. Log in to the web management interface.

Step 2. Go to Basic > TP-Link Cloud, and focus on the Bound Accounts section.
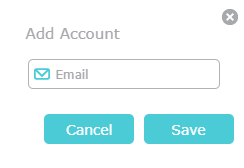
Bound Accounts section on the TP-Link Cloud page.

Step 3. Click Add account button., enter another TP-Link ID as needed, and click Save.

Add account pop-up window.

Step 4. The new TP-Link ID will be displayed in the Bound Accounts table as a User.

New TP-Link ID displayed as a User in the table.

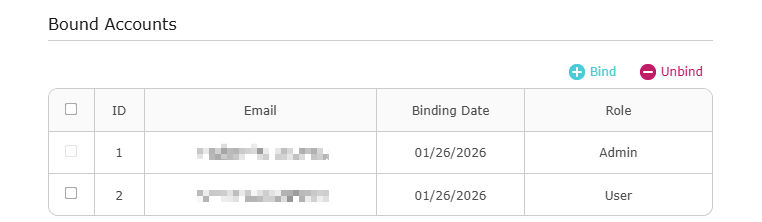
Step 5. If you want to remove TP-Link ID(s) from Managing the Router, check the box(es) of the TP-Link ID(s) you want to remove and click Unbind.

Unbind button to remove selected TP-Link ID(s).

QA

Q1: Can a User account change the router’s basic settings?

A1: Both Admin and User accounts can manage the router locally or remotely. However, User accounts cannot reset the router to its factory default settings or add/remove other TP-Link IDs.

Get to know more details of each function and configuration please go to Download Center to download the manual of your product.