How to set up TP-LINK DDNS on TP-Link Wireless Router (New Logo)
Note:
1. This FAQ is suitable for TP-Link wireless routers with cloud functions, such as Archer C8 V3, Archer C9 V3/V4, and so on.
2. Currently most of the applicable models only support the online upgrade feature, and other cloud functions will be added in the future firmware.
3. As for Archer C5400 V1, only the EU version supports the cloud services. Please check the hardware version on the label on the back of the router.
Most ISPs (Internet service providers) assign a dynamic IP address to the router and you can use this IP address to access your router remotely. However, the IP address can change at any time and you don’t know when it changes. In this case, you might need the DDNS (Dynamic Domain Name Server) feature on the router to allow you and your friends to access your router and local servers (FTP, HTTP, etc.) using a domain name, in no need of checking and remembering the dynamic IP addresses.
TP-LINK is one of the DDNS service providers on TP-Link wireless routers with cloud functions.
Here follow the steps below to set up your TP-LINK DDNS.
Step 1
Register and bind your TP-Link cloud account to the TP-Link wireless router. For how to, please click here.
Step2
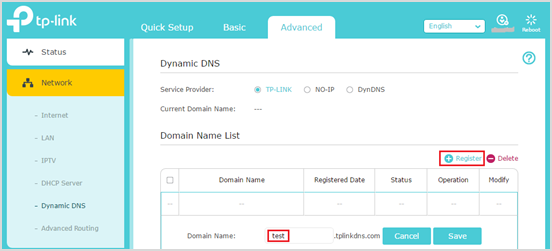
Go to Advance > Network > Dynamic DNS. Select TP-LINK as the DDNS service provider. Click Register, enter a hostname to create your own domain name, for example, test.tplinkdns.com. Then just click Save and the domain name will be bound to your router automatically.


Notes:
- Make sure you have internet when you’re registering a TP-LINK domain name.
- If you fail to register a TP-LINK domain name, it means your domain name has been registered by others. Please try to change another hostname.
- Your domain name will be bound to the external public IP address of your network. So don’t worry if the ISP assigns a private WAN IP address (such as 192.168.1.x) to the router.
- If you want to change the domain name, just click Unbind and Delete your current domain name. Then tap Register to bind a new one.
Get to know more details of each function and configuration please go to Download Center to download the manual of your product.
